Monday, February 17, 2014

Chipotle Chicken Stew

This had been a crazy winter!!  Here in New England we have about 2-3 feet of snow on the ground with another 8 inches headed our way for tomorrow!  I do love the snow, however a brief tropical vacation wouldn't hurt right now ;)

During last weeks storm I wanted to make something a little different then the normal chili or beef stew so I decided to try out a Mexican tortilla inspired soup.  Still hits that comfort food note but lighter then a stew.  This does have a kick, so you can reduce the amount of chili powder, or take it out all together in the beginning and add it to taste at the end. 

You can go nuts with the toppings for this!  We went with shredded cheese, scallions, sour cream and tortilla chips (that's what we had in the house!)  But next time I would definitely squeeze on some lime juice and add some chopped avocado.  Yum!!


3 Boneless Skinless Chicken Breasts
3 teaspoons cumin
1 teaspoon chili powder
2 teaspoons garlic powder
1 teaspoon salt
1/2 cup chopped onion    
2 chipotle chilis in adobo, seeds removed
1 tablespoon adobo, from the chilis
3 tablespoons tomato paste
1-15 ounce can of black beans, drained and rinsed
1 cup frozen corn
1- 28 ounce can of chopped tomatoes
1/4 cup corn meal
1/4 cup water
2 large bouillon cubes (directions should indicate one cube for 3 cups of water)
6 cups water
6 corn tortillas
salt and pepper
vegetable oil

topping options
scallions
sour cream
shredded cheese
avocado
tortilla chips
onion
limes
salsa

Preheat oven to 375 degrees.

In a small bowl mix together the cumin, chili powder, garlic powder and 1 teaspoon salt. 

Place chicken onto baking sheet.  Drizzle with oil and sprinkle each chicken breast with one teaspoon of the spice mixture.  Set aside the remainder.  Place the chicken in the oven for about 30 minutes until cooked through.  Remove from oven let cool until you are able to handle the chicken.  Using two forks shred the chicken.  

In a large dutch oven heat 1 tablespoon of oil over medium heat.  Add in the remainder of the spice mixture and the onions. Cook until the onions are translucent about 5-7 minutes.  Stir in the tomato paste, cook for 1 minute.   

Chop up the chipotle chilis and add them in, cook until fragrant, about 30 seconds. Add in the adobo, stir.

Pour in the six cups of water, 2 bouillon cubes, black beans, corn and shredded chicken.  Bring to a boil, turn down to simmer, cover and cook for 30 minutes.         

Mix together the 1/4 corn meal and 1/4 cup water.  Pour into the soup.  Place cover back on and let simmer for 15 more minutes.  

Chop up the corn tortillas into strips and add them into the soup.  Leaving the cover off cook for five more minutes.  

Add in salt and pepper to taste.  I added 1 teaspoon of salt.

Add toppings and serve!  

This recipe is adapted from the Food Network

Saturday, February 15, 2014

Stuffed Veal Chops

Going out to dinner for Valentine's Day is not something my husband and I are big fans of.  We like to cook a special meal and spend quality time together in our home.  This year we decided to make stuffed veal chops with risotto. What a fantastic meal it was! 

As with the majority of the meals I make, this dish was prepared in my cast iron skillet.  Cast iron gets an incredible crust on meat and is wonderful for dishes that need to go from stove top to oven!


2 bone in veal chops
3 T italian seasoned bread crumbs
3 T shredded sharp provolone cheese
1/8 cup marinated roasted red peppers
1/8 cup diced and cooked pancetta
freshly cracked pepper and salt
Cast Iron Skillet

To get started mix the bread crumbs, provolone cheese, peppers and pancetta.  If the filling is too crumbly add in some olive oil. Add in some fresh cracked pepper and set aside.

To prep the veal chops cut a slit in the side of the chop opposite the bone.  I cut the slit about an inch and a half deep.  You want it large enough to hold a lot of filling but not have the filling pop out the other side. 

Once both of the chops are cut put in the filling and secure with a toothpick. Season the chops liberally with salt and pepper.

Preheat oven to 375* and add 1 T of both butter and olive oil to a cast iron pan heated to medium high heat and sear the chops for 3 minutes a side.  Once seared on both sides put in the oven and cook for 10 minutes. Serve! 

One of the things I encourage with this recipe and all recipes is to change up the ingredients. Have fun and play with your ingredients. If you don't have access to pancetta use prosciutto or even bacon. If you prefer chicken to veal use chicken breasts and stuff with the filling.  Have fun with it! 

This recipe was adapted from Food Network

Monday, February 10, 2014

Tradition

To me the most important thing about food is it's ability to bring people together.  Every Sunday in Philadelphia I host Sunday dinner with my husband and who ever else would like to join.  As I cook my Sunday dinner I know that hundreds of miles away my sister is cooking Sunday dinner for our family.

Prime Rib with Roasted Vegetables


Ingredients

3 lb boneless prime rib
3 T dijon mustard
3 T whole peppercorns crushed
2 T fresh rosemary minced
2 T salt
6 cloves garlic
3 lbs red potatoes
3 lbs carrots
1 large onion
olive oil
salt and pepper
1/4 cup beef broth
1/4 cup cognac
1 cup beef broth
3 T butter
3 T flour

To get started preheat the oven to 500* Cut slits all over the roast beef with a sharp paring knife and put the garlic cloves into the roast beef. In a small bowl mix the salt, peppercorns and rosemary to create a paste and then rub on the meat. Once the meat is covered in the spice mixture slather the meat in the dijon mustard. Put the meat aside.

Prep the potatoes by cleaning and removing any bad spots, peeling and cutting the carrots and slicing the onions into wedges.  Put in the bottom of the roasting pan and drizzle with the olive oil, salt and pepper.  Toss to coat. Pour beef broth over the vegetables.  

If you have a roasting rack place it over the vegetables and place the meat on the rack.  If you don't have a roasting rack simply place the meat over the vegetables as they will act as a rack.  

Put in the oven at 500* for 30 minutes then kick down the heat to 300* for an hour or until the internal temperature is 145*  Take the meat out and allow to rest.  If the vegetables need more time to crisp up add them back into the oven at 500* until done to your liking.  

Make a pan sauce by removing the vegetables from the pan and deglazing with the cognac.  Mix the butter and flour into the bottom of the pan until it dissolves and add the beef broth.  Place your roasting pan over two burners and simmer until slightly thickened.  

Slice the meat and serve with the vegetables and gravy.


Saturday, February 8, 2014

Valentines Chocolate Bark

I love Valentines Day.  When I was younger my parents would give my sister and I a little box or a small decorative tin filled with little candies, sometimes jewelry and other lovable things!  It is just such a special memory.  I love that I get to do the same for my kids now.    

Another reason I love Valentines day is that it is all about the sweets!  I wanted to come up with some fun and easy gift ideas for teachers and friends.  This chocolate bark is so fun!  You can use milk or dark chocolate, or white on bottom and drizzle with milk or dark on top.  I chose to do milk chocolate on the bottom and drizzle with the white chocolate, so yummy!

I found some adorable heart candies and sprinkles at my local craft store and had some white and red sparkly sugar left over from Christmas!  Kids love to help with the sprinkles!


1 bag milk chocolate chips (11.5oz)
1/4 bag of white chocolate chips (11.5oz)
1/2 tablespoon plus 1/2 teaspoon of shortening
valentines themed candies
wax paper
Ziploc bag 

Cover a half sheet pan with wax paper.

In a microwave safe bowl combine the milk chocolate and the 1/2 tablespoon of shortening.  Heat in 10 second intervals stirring in between until the shortening melts into the chocolate and the chips completely melt.

Pour the chocolate onto the wax paper and spread out with a rubber spatula.  I spread mine fairly thin, but you can leave it a bit thicker if you wish.  Doesn't have to be perfect, that's the great thing about this candy!


Sprinkle on your candies!


In another microwave safe bowl combine the white chocolate and 1/2 teaspoon of shortening.  Again heat in 10 second intervals.  This will only take about 30-40 seconds depending on the microwave.

Place the white chocolate in a small plastic Ziploc bag.  Cut a small slit in the bottom corner of the bag. Drizzle on the white chocolate!  Add any more small candies you would like!  I added the sparkly sugar at this point.  


Allow this to sit overnight.  

The chocolate will not be as hard as it was when in chip form.  We added the shortening so it will be hardened but now with a much creamier texture.You can break the chocolate into large or small pieces, whatever you choose.  I use my hands because I like the rough look of it.  If you want a cleaner edge you can use a large knife.

Enjoy!


Monday, February 3, 2014

Pretzel Bites

Remember when you were a teenager and you would wander around the mall with your friends on a Friday night?  Remember those little pretzel shops with the smell of butter wafting out as you walked bye?  Not sure if I ever made it through without buying some.  And lets be serious, I still can't resist them today as a 30 year old mom.

This weekend I found a pretzel recipe, and it brought me right back to the mall.  Soft and buttery- I think I ate 20 of them.  Don't worry they're small!

This is a yeast recipe....don't be scared!  It has a very short rise time and if you have a stand mixer with a dough hook, its a breeze.  There is even a mini science experiment involved.  Fun!


dough
2 1/2 cups bread flour
1 teaspoon salt
1 teaspoon sugar
2 1/4 teaspoons instant yeast (if you have the strip of yeast packets use one packet)
1 cup warm water

bath
1 cup boiling water
2 tablespoons baking soda

topping
6 tablespoons melted butter
salt

In the bowl of a stand mixer fitted with the paddle attachment combine the flour, salt, sugar, yeast and warm water.  


Beat until well combined.

Remove the paddle.  Scrape off the dough and place it back in the bowl.  


Add on the dough hook.


On medium speed, knead the dough.  You will want the dough to be smooth in texture, but it will still have wrinkles.  Mine took about 6 minutes.  This is what it will look like.  The dough hook will form this ball for you. 


Sprinkle some flour onto the dough to coat.  Remove from the mixer bowl and let the dough rest for 30 minutes in a large plastic bag or loose plastic wrap.  It needs to be able to grow, so if you use saran wrap leave it loose.  I had to loosen mine a couple of times.  


While the dough is rising- It's science experiment time!  In a small bowl place the 2 tablespoons of baking soda.  Pour the cup of boiling water over it (slowly).  Yay!!  Bubbles.  Brings me back to elementary school!  It will calm down in a minute.  Allow the solution to cool down while waiting for the dough.  


30 minutes later......

Puffy dough!


Heat your oven to 400 degrees and lightly grease a baking sheet.

Lightly grease your work surface.  I sprayed my counter with a little bit of cooking spray.  

Gently form the dough into a log, this just makes it easier to divide up.  


Cut the dough into 6 equal sections...as equal and you can get them.


Now roll each piece of dough into a 12 inch rope.  If it is a little longer that will be fine.  The dough may fight with you a little bit, just give it a pull at each end if you have to!  


Cut each rope into 10 little bites!  Set aside for a minute.


Pour the water and baking soda solution into a 9x13 inch glass dish.  

Place all the bites into the solution for their bath.  Move them around so each side is coated and them let them rest in the solution for 5 minutes.  


Almost done!  I swear it is worth the work!  Place each bite onto the prepared baking sheet.  Sprinkle with salt, as much or as little as you like.  


Bake for 12-15 minutes.  They will be light golden brown.  Some of them ended up looking like mini loaves of bread, cute!
  

Melt the 6 tablespoons of butter and dip in each bite.  Place them on a serving dish.  Eat!!  


If you are not eating these right away store them in an air tight container and reheat them right before serving. 

This recipe is adapted from King Arthur Flour 


Saturday, February 1, 2014

Tarragon Brown Butter Scallops

Scallops.  Need I say more?  These are a quick and delicious addition to a meal, or make a few more and serve as the entree.  You can try different herbs with the butter, this time I tried the tarragon, really delicious.  The method gives the scallops a crisp crust and a soft and buttery inside.  Enjoy!


4 large sea scallops
2 tablespoons butter, softened
1 teaspoon dried tarragon
2 tablespoons lemon juice
2 tablespoons olive oil
Salt and Pepper

In a small dish mix together the softened butter with the tarragon.

In a small saute pan add in the 2 tablespoons of olive oil.  Place over medium high heat.

Dry off the scallops with paper towels.  Drying them ensures they brown properly. Season with salt and pepper.

Add them into the hot oil. Let cook for 3 minutes without moving them.

Turn them over.  Add in the  tarragon butter.  It will foam up- but it will settle down.  Turn heat down a tad to medium.

Cook scallops for 4 minutes.  Occasionally spooning the pan sauce over the top of the cooking scallops.

Remove pan from heat.  Add in lemon juice.

Plate the scallops.  Give the pan juices a stir,  then pour over the scallops.

Enjoy!


This recipe was adapted from Bon Appetit! 

Friday, January 24, 2014

Mushroom and Goat Cheese Chicken

Over the summer I went through all of my food magazines.  I pulled out recipes that I wanted to try and threw the rest of the magazine away.....harder than it may seem.  I put them together in a binder and this was one of the recipes!

The response from the husband after this meal was, "you should make that again!"

It was time consuming, but a lot can be prepared ahead of time.  I served this with mushroom risotto.  I will share that recipe later in the week!


 4 large boneless and skinless chicken breasts
6 ounces herb and garlic goat cheese, at room temperature
10 ounces cremini mushrooms
2 cups shitake mushrooms
1/4 cup chicken stock
1/4 cup white wine
3 tablespoons butter
olive oil and vegetable oil
salt and pepper

One at a time place each chicken breast between two pieces of plastic wrap and pound the chicken until 1/4-1/2 inch thick. 

Season each chicken breast with salt and pepper.  Set aside.

Place the cremini mushrooms into a large food processor. Pulse until mushrooms are finely minced.


Place a large dutch oven or saute pan over medium heat.  Add 1 tablespoon of butter and the minced mushrooms.  Cook over medium heat, stirring occasionally  until all the liquid comes out the mushrooms and then cooks off, about 10 minutes.

Meanwhile....

Divide the goat cheese into four sections.  Spread each of the four breasts with the goat cheese.  If the cheese is not spreading easily microwave it for 10 seconds to soften.  
  
   
The mushrooms are probably done now!  Add a pinch of salt and pepper and remove them from the heat.  Place 1/4 cup of the mushrooms on each chicken breast.  


Roll each chicken breast up like a burrito.  You can use kitchen twine to secure them.  I didn't have any, but I will use it in the future.  I would recommend one tie on each end.


 If you are planning this ahead of time, at this point you can put the rolls in the fridge and finish at dinner time. 

Otherwise......

Set the rolls aside for a moment.  In a medium size saucepan boil 2 cups of water.  Add in the shitake mushrooms.  Turn off the heat, place the cover onto the pot and let steep for 10 minutes.  This will help to infuse the mushroom flavor into the water.  

Now is a good time to open the white wine and have a glass!  Or in my case feed the baby....    

Once the 10 minutes are up remove the mushrooms from the now mushroom broth with a slotted spoon and set them aside.  Bring the broth back to a boil.  Boil rapidly to reduce the liquid in half.  Once reduced add in the chicken broth and the wine.  Boil rapidly for 3 minutes.  Add back in the shitake mushrooms and reduce to simmer.

While that is summering away, heat 1 tablespoon of olive oil and 1 teaspoon of vegetable oil in a large saute pan over medium heat.  Place the chicken rolls into the hot pan and cook on each side for about 4-5 minutes until golden brown and cooked through.  


  When the chicken is cooked though remove the simmering sauce from the heat.  Swirl in the remaining 2 tablespoons of butter until melted.  Plate each chicken breast and top with the sauce.

Enjoy!

This recipe was adapted from The Food Network Kitchens


Monday, January 20, 2014

Potato Skins


Potato, cheese, sour cream, whats not to love??  Perfect football food.  And even though our Patriots blew it big time, we will still watch the super bowl.  Mostly because I like the food.....

I bake these 3 times, it gives you the crunchy skin without having to fry them.


8 Russet Potatoes, scrubbed clean
1 cup sour cream
2 cups grated monterey jack cheese
2 scallions chopped
vegetable oil
kosher salt

Preheat the oven to 425 degrees.  On a foil lined baking sheet place the cleaned potatoes.  Drizzle with oil and then with your hands rub the potatoes to coat them.  Sprinkle generously with the kosher salt and again rub the salt all over to coat them.  Place in the oven for 45 minutes, until fork tender.

Remove from the oven and let cool until you can handle them.  

Cut each potato in half, lay back onto cookie sheet.


Scoop out the center of the potato, leaving none or a little bit of the potato in the skin, your preference.   


Place the potatoes back in the oven for 10-15 minutes.  Just to crunch up the skins a bit more!

Remove from oven and top with each with 2 tablespoons of cheese.  Put back in the oven for 5 minutes, until cheese is melted and gooey!


Remove from oven and place on serving platter.  Top with 1 Tablespoons of sour cream and sprinkle on some scallions!


Enjoy!! 

Sunday, June 5, 2011

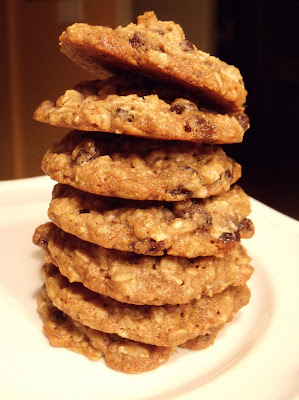
Oatmeal Raisin Cookies

After some serious blog neglect it is time to get back to it!  This has been a really busy time for us and I just have not had any blog time.  I did just escape to one of my favorite mom's nights out, scrap booking, and made these delicious oatmeal cookies to bring.  I have made these with raisins or with cranberries and white chocolate.  Both are delicious!  The spices in these cookies are just perfect.  This recipe makes about 4 dozen cookies, you can cut it in half.


Oatmeal Raisin Cookies

1 stick butter
1/2 cup vegetable shortening
1 cup light brown sugar
1/2 cup sugar
2 teaspoons vanilla
2 1/2 teaspoons cinnamon
1/4 teaspoon nutmeg
1 teaspoon salt
2 teaspoons cider vinegar
2 large eggs
1 teaspoon baking soda
1 1/2 cups flour
3 cups quick cooking oats
2 cups raisins or 1 cup dried cranberries with 1 cup white chocolate chips


Preheat oven to 350 degrees.  Line baking sheets with parchment paper.

In a stand mixer combine the first 9 ingredients.  Mix until smooth.  Add in eggs on at a time, mixing in between each addition.  Add flour and baking soda.  Mix to combine.

Add in oats and raisins, stir until incorporated. 

Using a 1 1/2 inch cookie scoop place cookie dough about 2 inches apart on sheet.  Bake for 12-14 minutes.  Allow to cool on the pan for about 5 minutes before moving to cooling rack.

Thursday, May 5, 2011

Happy Cinco de Mayo!

Even though there is nothing like a real margarita, these margarita shaped cookies are really cute, and yummy. Enjoy the day :)